开发APP时怎样快速实现模板的定制方法,模板的定制使用在用AndroidStudio的向导新建工程时,会显示许多Android Studio内置的Activity模板,深圳APP开发公司整理如图25-3所示: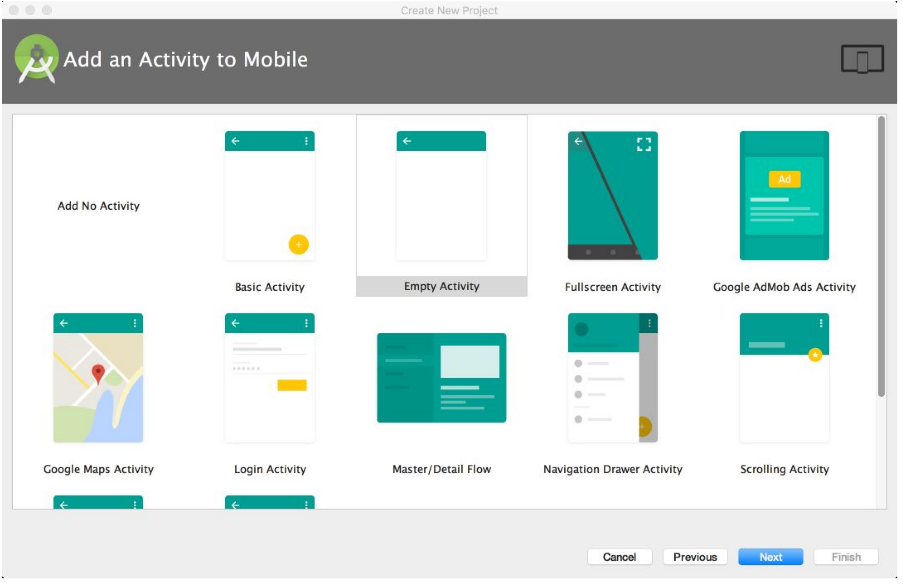
或在工程中选择新建Activity时,也可以选择内置的Activity模板,如图25-4所示: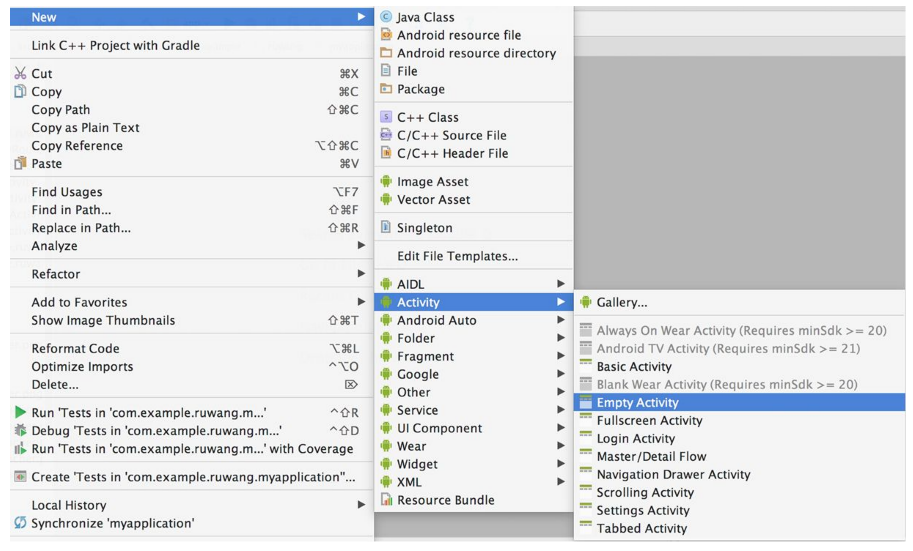
这样可以大大提高开发效率。这些模板放在AndroidStudio安装路径的如下文件夹中:plugins\android\lib\templates\activities,用户也可以自己定制模板。大多数APP都有登录功能,现参考AndroidStudio中提供的LoginActivity模板,定制一个登录功能用的rwLoginActivity模板,名称为“RuWangLoginActivity”,界面如图25-5所示: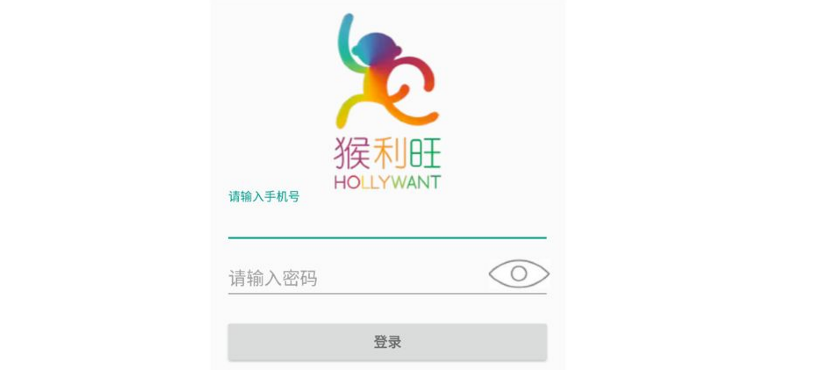
首先编写rwLoginActivity.java代码和activity_rw_login.xml文件实现此Activity,然后在此基础上实现模板。
参考AndroidStudio提供的模板,要定制一个模板,涉及如图25-6所示的文件: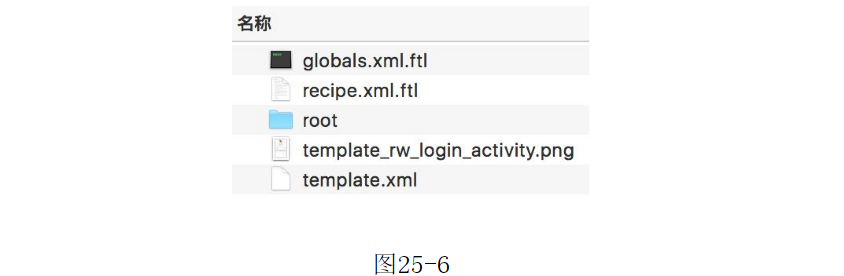 图25-6template_rw_login_activity.png—对应在AndroidStudio中用向导创建Activity时,在图25-3界面看到的Activity界面示意图。template.xml—用于定义属性参数,内容如下:<? xml version=" 1. 0"?> < template format=" 5" revision=" 1" // 模板 名称 name=" RuWang Login Activity"
description=" Creates a new login activity, allowing users to enter a phone number and password to log in to or register with your application." requireAppTheme=" true" // 此 Activity 支持 的 最小 API 级别 minApi=" 17" minBuildApi=" 17"> < category value=" Activity" /> < formfactor value=" Mobile" /> //以下 parameter 参数 和 相关 属性 会在 创建 Activity 时 的“ Customize the Acitvity” 界面 用到, 需要 用户 输入 一些 参数 值, 且 向 用户 显示 一些 提示 信息, default 和 help 的 内容 支持 中 英文 < parameter id=" activityClass" name=" Activity Name" type=" string" constraints=" class| unique| nonempty" default=" rwLoginActivity" help=" The name of the activity class to create" /> < parameter id=" layoutName"
name=" Layout Name" type=" string" constraints=" layout| unique| nonempty" suggest="${ activityToLayout( activityClass)}" default=" activity_ rw_ login" help=" The name of the layout to create for the activity" /> < parameter id=" activityTitle" name=" Title" type=" string" constraints=" nonempty" default=" 登录" help=" The name of the activity." /> < parameter id=" passwordLength" name=" Password Length" type=" string" constraints=" nonempty" default=" 6" help=" 设置 密码 长度" /> < parameter id=" parentActivityClass"
name=" Hierarchical Parent" type=" string" constraints=" activity| exists| empty" default="" help=" The hierarchical parent activity, used to provide a default implementation for the 'Up' button" /> < parameter id=" packageName" name=" Package name" type=" string" constraints=" package" default=" com. mycompany. myapp" /> < thumbs> < thumb> template_ rw_ login_ activity. png</ thumb> </ thumbs> < globals file=" globals. xml. ftl" /> < execute file=" recipe. xml. ftl" /> </ template> globals. xml. ftl 和 recipe. xml. ftl 的 后缀 是 ftl, 表示 这 两个 文件 使 用的 是 FTL( FreeMarker Template Language) 语言, 这是 一种 简单 的 模板 编写 语言。
globals. xml. ftl —用于 定义 属性 参数, 内容 如下: <? xml version=" 1. 0"?> < globals> // 定义 此 Activity 界面 是否 有 ActionBar, value 为 true, 表示 不需要 ActionBar < global id=" hasNoActionBar" type=" boolean" value=" true" /> // 定义 此 Activity 是否 具有" android. intent. action. MAIN" 和" android. intent. category. LAUNCHER" 两个 属性 < global id=" isLauncher" type=" boolean" value="${ isNewProject? string}" /> < global id=" GenericStringArgument" type=" string" value="<# if buildApi lt 19> String</# if>" /> < globals file="../ common/ common_ globals. xml. ftl" /> </ globals> 其中 lt 是 FTL 语言 关键字, 相当于 比较 运算符“ 小于”, 其他 几个 类似 功能 的 关键字: gt: 比较 运算符" 大于" gte: 比较 运算符" 大于 或 等于" lte: 比较 运算符" 小于 或 等于"
recipe.xml.ftl—用于对代码文件和资源文件的处理。AndroidStudio提供的LoginActivity模板界面没有图片,rwLoginActivity模板界面有图片,需要在recipe.xml.ftl文件中增加一个copy指令,复制模板资源图片到工程中的资源目录下:
< copy from=" root/ res/ drawable" to="${ escapeXmlAttribute( resOut)}/ drawable" />
文件的完整内容如下:
<? xml version=" 1. 0"?> < recipe> <# if appCompat && !(hasDependency(' com. android. support: appcompat- v7'))> < dependency mavenUrl=" com. android. support: appcompat- v7:${ buildApi}.+" /> </# if> <# if (buildApi gte 22) && appCompat && !(hasDependency(' com. android. support: design'))> < dependency mavenUrl=" com. android. support: design:${ buildApi}.+" /> </# if> < merge from=" root/ AndroidManifest. xml. ftl" to="${ escapeXmlAttribute( manifestOut)}/ AndroidManifest. xml"
< merge from=" root/ res/ values/ dimens. xml" to="${ escapeXmlAttribute( resOut)}/ values/ dimens. xml" /> < merge from=" root/ res/ values/ strings. xml. ftl" to="${ escapeXmlAttribute( resOut)}/ values/ strings. xml" /> < copy from=" root/ res/ drawable" to="${ escapeXmlAttribute( resOut)}/ drawable" /> < instantiate from=" root/ res/ layout/ activity_ rw_ login. xml. ftl" to="${ escapeXmlAttribute( resOut)}/ layout/${ layoutName}. xml" /> < instantiate from=" root/ src/ app_ package/ rwLoginActivity. java. ftl" to="${ escapeXmlAttribute( srcOut)}/${ activityClass}. java" /> < open file="${ escapeXmlAttribute( srcOut)}/${ activityClass}. java" /> </ recipe>
在root文件夹里包含此Activity相关的代码文件、资源文件和AndroidManifest文件,如图25-7所示: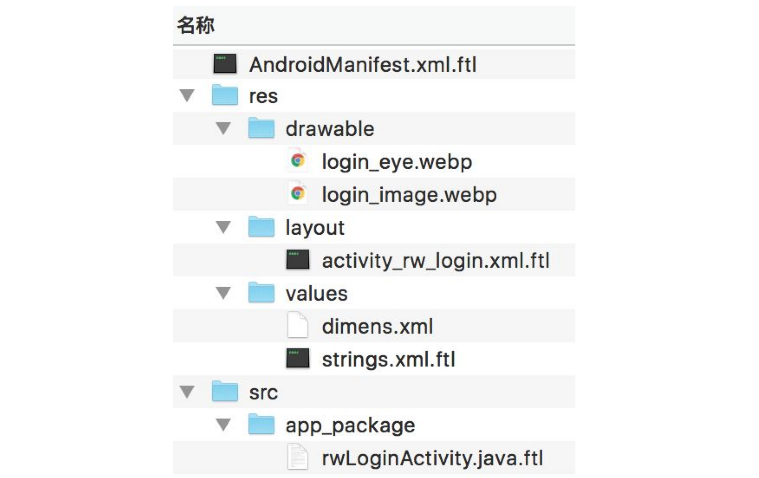
AndroidStudio提供的LoginActivity模板界面有ActionBar,rwLoginActivity模板界面没有ActionBar,需要把AndroidManifest.xml.ftl文件里的主题设置代码改成自己需要的主题名称:
<# if hasNoActionBar> android: theme="@ style/ Theme. AppCompat. Light. NoActionBar"
文件的完整内容如下:
< manifest xmlns: android=" http:// schemas. android. com/ apk/ res/ android" > < application> < activity android: name=".${ activityClass}" <# if isNewProject> android: label="@ string/ app_ name" <# else> android: label="@ string/ title_${ simpleName}" </# if> <# if hasNoActionBar> android: theme="@ style/ Theme. AppCompat. Light. NoActionBar" </# if> <# if buildApi gte 16 && parentActivityClass != ""> android: parentActivityName="${ parentActivityClass}"</# if>> <# if parentActivityClass != ""> < meta- data android: name=" android. support. PARENT_ ACTIVITY" android: value="${ parentActivityClass}" />
</# if> <# if isLauncher && !(isLibraryProject! false)> < intent- filter> < action android: name=" android. intent. action. MAIN" /> < category android: name=" android. intent. category. LAUNCHER" /> </ intent- filter> </# if> </ activity> </ application> </ manifest>
rwLoginActivity.java.ftl可以在之前写好的rwLoginActivity.java文件基础上做修改,导入包名的代码改成:
package ${ packageName};
类名和父类名改成:
public class ${ activityClass} extends ${ superClass}
密码长度参数的赋值语句改成:
private int mPasswordLength = ${ passwordLength};
文件的完整内容如下:
package ${ packageName}; import android. content. res. ColorStateList; import android. graphics. Color; import android. graphics. PorterDuff; import android. support. v4. view. ViewCompat; import android. support. v7. app. AppCompatActivity; import android. os. Bundle; import android. text. TextUtils; import android. text. method. HideReturnsTransformationMethod; import android. text. method. PasswordTransformationMethod; import android. view. KeyEvent; import android. view. View; import android. view. View. OnClickListener; import android. view. inputmethod. EditorInfo; import android. widget. AutoCompleteTextView; import android. widget. Button; import android. widget. EditText; import android. widget. TextView;
import java. util. regex. Matcher; import java. util. regex. Pattern; public class ${ activityClass} extends ${ superClass} { private AutoCompleteTextView mPhoneView; private EditText mPasswordView; TextView mLoginEye; boolean mIsDisplayPassword = false; private int mPasswordLength = ${ passwordLength}; @ Override protected void onCreate( Bundle savedInstanceState) { super. onCreate( savedInstanceState); setContentView( R. layout. activity_ rw_ login); // Set up the login form. mPhoneView = (AutoCompleteTextView) findViewById( R. id. phone); mPasswordView = (EditText) findViewById( R. id. password); mPasswordView. setOnEditorActionListener( new TextView. OnEditorActionListener() { @ Override public boolean onEditorAction( TextView textView, int id,
KeyEvent keyEvent) { if (id == R. id. login || id == EditorInfo. IME_ NULL) { attemptLogin(); return true; } return false; } }); mLoginEye = (TextView) findViewById( R. id. login_ eye); mLoginEye. setOnClickListener( new View. OnClickListener() { @ Override public void onClick( View v) { OnSetDisplayPassword(); } }); Button mSignInButton = (Button) findViewById( R. id. sign_ in_ button); mSignInButton. setOnClickListener( new OnClickListener() { @ Override public void onClick( View view) { attemptLogin(); } });
} private void attemptLogin() { // Reset errors. mPhoneView. setError( null); mPasswordView. setError( null); // Store values at the time of the login attempt. String phone = mPhoneView. getText(). toString(); String password = mPasswordView. getText(). toString(); boolean cancel = false; View focusView = null; // Check for a valid password, if the user entered one. if (!TextUtils. isEmpty( password) && !isPasswordValid( password)) { mPasswordView. setError( getString( R. string. error_ invalid_ password)); focusView = mPasswordView; cancel = true; } // Check for a valid phone. if (TextUtils. isEmpty( phone)) {
mPhoneView. setError( getString( R. string. error_ field_ required)); focusView = mPhoneView; cancel = true; } else if (!isPhone( phone)) { mPhoneView. setError( getString( R. string. error_ invalid_ phone)); focusView = mPhoneView; cancel = true; } if (cancel) { // There was an error; don' t attempt login and focus the first // form field with an error. focusView. requestFocus(); } else { // perform the user login attempt. logIn( phone, password); } } /** * 判断 手机 格式 是否 正确 *
* @param phone 手机 号 * @return true 正确 false 错误 */ public static boolean isPhone( String phone) { if (TextUtils. isEmpty( phone)) { return false; } Pattern p = Pattern .compile("^(( 13[ 0- 9])|( 14[ 5, 7])|( 17[ 0- 9])|( 15[^ 4,\\ D])|( 18[ 0- 9]))\\ d{ 8}$"); Matcher m = p. matcher( phone); return m. matches(); } private boolean isPasswordValid( String password) { // TODO: Replace this with your own logic return password. length() >= mPasswordLength; } private void OnSetDisplayPassword() { mIsDisplayPassword = !mIsDisplayPassword; if (mIsDisplayPassword) { ViewCompat. setBackgroundTintList( mLoginEye, ColorStateList. valueOf( Color. parseColor("# FF4081")));
ViewCompat. setBackgroundTintMode( mLoginEye, PorterDuff. Mode. SCREEN); mPasswordView. setTransformationMethod( HideReturnsTransformationMethod. getInstance()); } else { ViewCompat. setBackgroundTintList( mLoginEye, ColorStateList. valueOf( Color. parseColor("# CCCCCC"))); ViewCompat. setBackgroundTintMode( mLoginEye, PorterDuff. Mode. SCREEN); mPasswordView. setTransformationMethod( PasswordTransformationMethod. getInstance()); } } private void logIn( String phone, String password) { } }
activity_rw_login.xml.ftl也可以在之前写好的activity_rw_login.xml文件基础上做修改,里面涉及类名的地方改成:
tools: context="${ relativePackage}.${ activityClass}"
文件的完整内容如下:
< LinearLayout xmlns: android=" http:// schemas. android. com/ apk/ res/ android" xmlns: tools=" http:// schemas. android. com/ tools" android: layout_ width=" match_ parent" android: layout_ height=" match_ parent" android: gravity=" center_ horizontal" android: orientation=" vertical" android: paddingBottom="@ dimen/ activity_ vertical_ margin" android: paddingLeft="@ dimen/ activity_ horizontal_ margin" android: paddingRight="@ dimen/ activity_ horizontal_ margin" android: paddingTop="@ dimen/ activity_ vertical_ margin" tools: context="${ relativePackage}.${ activityClass}"> < ScrollView android: id="@+ id/ login_ form" android: layout_ width=" match_ parent" android: layout_ height=" match_ parent"> < LinearLayout android: id="@+ id/ phone_ login_ form"
android: layout_ width=" match_ parent" android: layout_ height=" wrap_ content" android: orientation=" vertical"> < ImageView android: id="@+ id/ login_ image" android: layout_ width=" match_ parent" android: layout_ height=" wrap_ content" android: src="@ drawable/ login_ image" /> < android. support. design. widget. TextInputLayout android: layout_ width=" match_ parent" android: layout_ height=" wrap_ content"> < AutoCompleteTextView android: id="@+ id/ phone" android: layout_ width=" match_ parent" android: layout_ height=" wrap_ content" android: hint="@ string/ prompt_ phone" android: inputType=" phone" android: maxLines=" 1" android: singleLine=" true" /> </ android. support. design. widget. TextInputLayout>
< FrameLayout android: id="@+ id/ password_ layout" android: layout_ width=" match_ parent" android: layout_ height=" wrap_ content"> < android. support. design. widget. TextInputLayout android: layout_ width=" match_ parent" android: layout_ height=" wrap_ content"> < EditText android: id="@+ id/ password" android: layout_ width=" match_ parent" android: layout_ height=" wrap_ content" android: hint="@ string/ prompt_ password" android: imeActionId="@+ id/ login" android: imeActionLabel="@ string/ action_ sign_ in" android: imeOptions=" actionUnspecified" android: inputType=" textPassword" android: maxLines=" 1" android: singleLine=" true" /> </ android. support. design. widget. TextInputLayout> < android. support. v7. widget. AppCompatTextView android: id="@+ id/ login_ eye"
android: layout_ width=" wrap_ content" android: layout_ height=" wrap_ content" android: layout_ gravity=" center| right" android: background="@ drawable/ login_ eye" android: gravity=" center" android: paddingRight=" 12dp" /> </ FrameLayout> < Button android: id="@+ id/ sign_ in_ button" style="? android: textAppearanceSmall" android: layout_ width=" match_ parent" android: layout_ height=" wrap_ content" android: layout_ marginTop=" 16dp" android: text="@ string/ action_ sign_ in" android: textStyle=" bold" /> </ LinearLayout> </ ScrollView> </ LinearLayout>
完成开发后,把rwLoginActivity模板文件夹放在AndroidStudio安装路径的如下文件夹中:plugins\android\lib\templates\activities,关闭并重启Android
Studio,就可以使用rwLoginActivity模板了。创建rwLoginActivity的界面如图25-8和图25-9所示: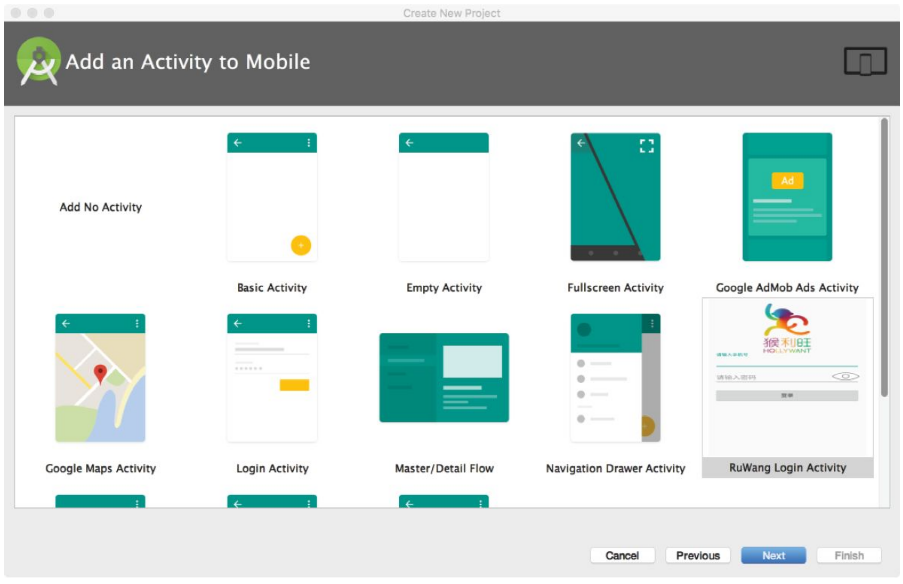
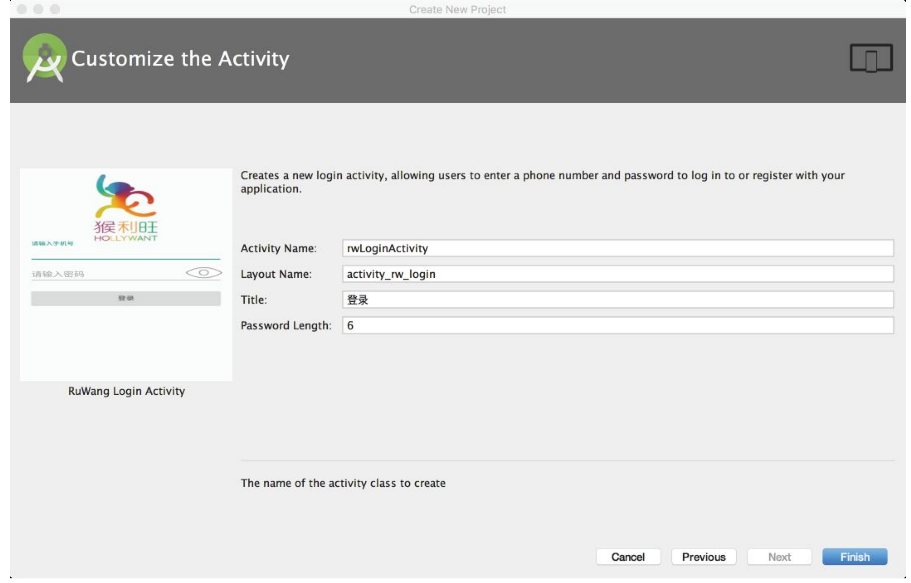 在工程中选择新建Activity时,也可以使用rwLoginActivity模板了,如图25-10所示: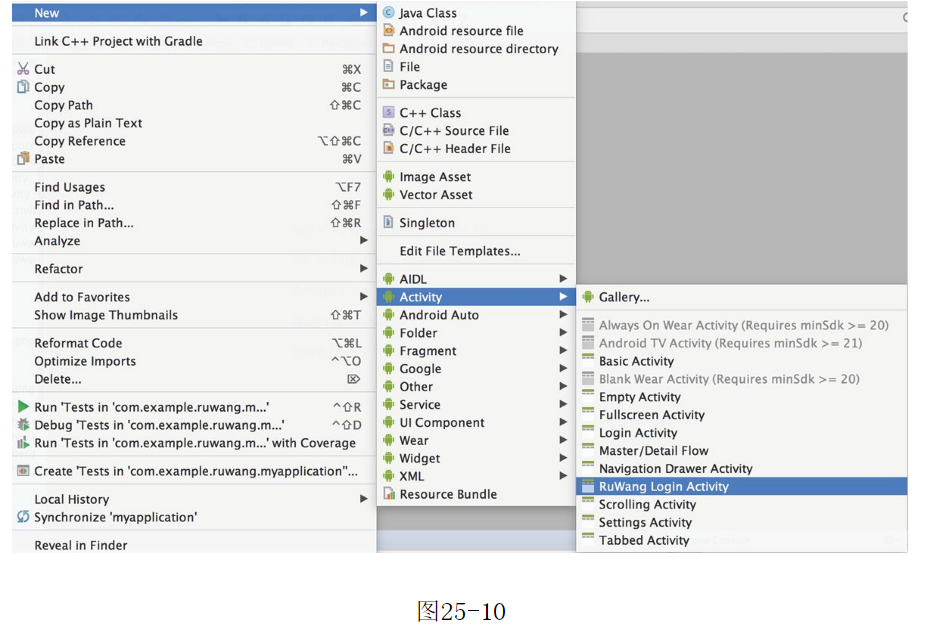
好了,APP开发公司本文关于“开发APP时怎样快速实现模板的定制方法”详解,就分享到这里,谢谢关注,博纳网络编辑整理。